 how-to
How Do You Install Garden Edging for Ground Covers?
Last Updated: October 25, 2026
Quick Summary
To install garden edging for ground covers, clear the line of grass and weeds, dig a narrow trench along your marked border, compact the base, then set, join and stake the edging sections. Backfill both sides, compact the soil, and match the buried depth to how your ground cover spreads.
- Mark the border around the plant's mature spread, not its current size.
- Steel suits permanent borders, plastic suits curved beds and surface runners.
- Set rhizome spreaders deeper, with a continuous root barrier where spread is aggressive.
- Keep mulch below the top of the edging to prevent runners bridging across.
- Trim runners before they reach the lip rather than after they cross it.
Table of Contents
- Planning Your Garden Edging Layout Around Ground Covers
- Choosing the Right Edging Material for Ground Covers
- Garden Edging Tools and Materials You Will Need
- How Deep to Install Garden Edging for Different Ground Covers
- Step-by-Step Installation: Preparing the Bed and Setting the Edging
- Plastic Garden Edging Installation: A Flexible Option for Curved Beds
- Preventing Ground Covers from Spreading Beyond the Border
- Request a Landscaping Quote for Your Garden Edging Project
- Frequently Asked Questions
Planning Your Garden Edging Layout Around Ground Covers
A clean garden border starts with a good plan, not a shovel. Ground covers spread sideways by design, so the edging line has to be drawn around the plant's mature width, not its current size. Get this wrong and you will be lifting edging within two seasons.
Before you mark anything, decide what the border is for. Is it separating garden beds from lawn, holding mulch on a slope, or stopping a vigorous ground cover from invading a path? Each job calls for a different line and a different edging profile.
Sketch the bed on paper first. Note paths, downpipes, tree roots and any slope. A curve looks softer around ground covers, while straight runs suit formal layouts and are easier to edge cleanly.
Measuring the Border and Marking the Line
Measure the full run of the border with a measuring tape, then add a little extra for curves and offcuts. For a curved bed, run a string line or garden hose along the intended line and measure that path instead of measuring straight across.
Mark the line with spray paint or sand. Step back and check it from a few angles before you cut soil. It is far easier to shift a painted line than a dug trench.
- Measure each straight run separately
- Add extra length for curves and corners
- Mark with spray paint, sand or a hose laid on the ground
- Check the line against the plant's mature spread
Choosing the Right Edging Material for Ground Covers
The best edging material for ground covers is one that sits deep enough to block roots and rhizomes while still looking tidy above the soil. Steel, plastic and composite all do this job, but they suit different sites.
Steel edging gives a sharp, long-lasting line and holds its shape well on curves. It costs more and needs careful handling, but it is the pick for a permanent border.
Plastic edging is flexible, light and easy to cut, which makes it ideal for curved beds and tight corners. It suits ground covers that spread by surface runners rather than deep roots.
Composite edging mimics timber without the rot and is a good middle option for raised beds and straight runs.
| Material | Best For | Durability | Curves |
|---|---|---|---|
| Steel | Permanent borders, strong root control | Very high | Good with pre-formed curves |
| Plastic | Curved beds, surface-spreading covers | Moderate | Excellent |
| Composite | Straight runs, raised beds | High | Limited |
Garden Edging Tools and Materials You Will Need
Gather everything before you start digging. A half-finished trench left open overnight invites collapse and rain damage.
- Spade and shovel for trenching
- Measuring tape and string line
- Spray paint or sand for marking
- Edging sections, connectors and stakes or pegs
- Rubber mallet for driving stakes
- Spirit level for checking height
- Pruning shears for trimming roots and plants
- Wheelbarrow for soil and backfill
Wear gloves and closed shoes. If you are cutting steel, add safety glasses. Plan where the spoil will go before you dig, because a border trench produces more soil than most people expect.
How Deep to Install Garden Edging for Different Ground Covers
Depth is where most ground-cover borders fail, because the edging is set for how the plant looks on planting day rather than how it spreads.
Start by identifying the growth habit. A clumping cover such as a native grass spreads outward from a tight crown and rarely tunnels far, so a shallow trench that buries most of the edging profile is usually enough.
As a working rule, set the edging so that most of its profile is buried for clumping covers, leave a low, neat lip of roughly a finger's width for surface runners, and set rhizome spreaders deeper again so the base of the edging sits below the bulk of the rhizome zone.
Soil type changes the calculation. Clay holds water and swells and shrinks through wet and dry cycles, which can heave a shallow border out of line; sand drains fast and offers little resistance to a determined runner; loam is the most forgiving.
- Clumping covers: shallow trench, most of the profile buried
- Surface runners: low continuous lip the stems cannot cross
- Rhizome spreaders: deeper set, with a root barrier where spread is aggressive
- Clay sites: deeper and more firmly bedded to resist heave
- Sandy sites: deeper to compensate for loose, low-resistance soil
- Sloped beds: deeper again, with careful backfill and compaction
If you are unsure how deep to go for a particular cover, or your site combines clay, slope and an aggressive spreader, it is worth having the border planned around the planting rather than guessing. Requirements vary with the site, so treat these as practical starting points and adjust to what you find in the ground.
Step-by-Step Installation: Preparing the Bed and Setting the Edging
Preparation decides whether the border lasts. Clear the line of grass, weeds and loose soil, then dig a narrow trench along your marked path with a spade. Keep the trench walls straight and the base firm.
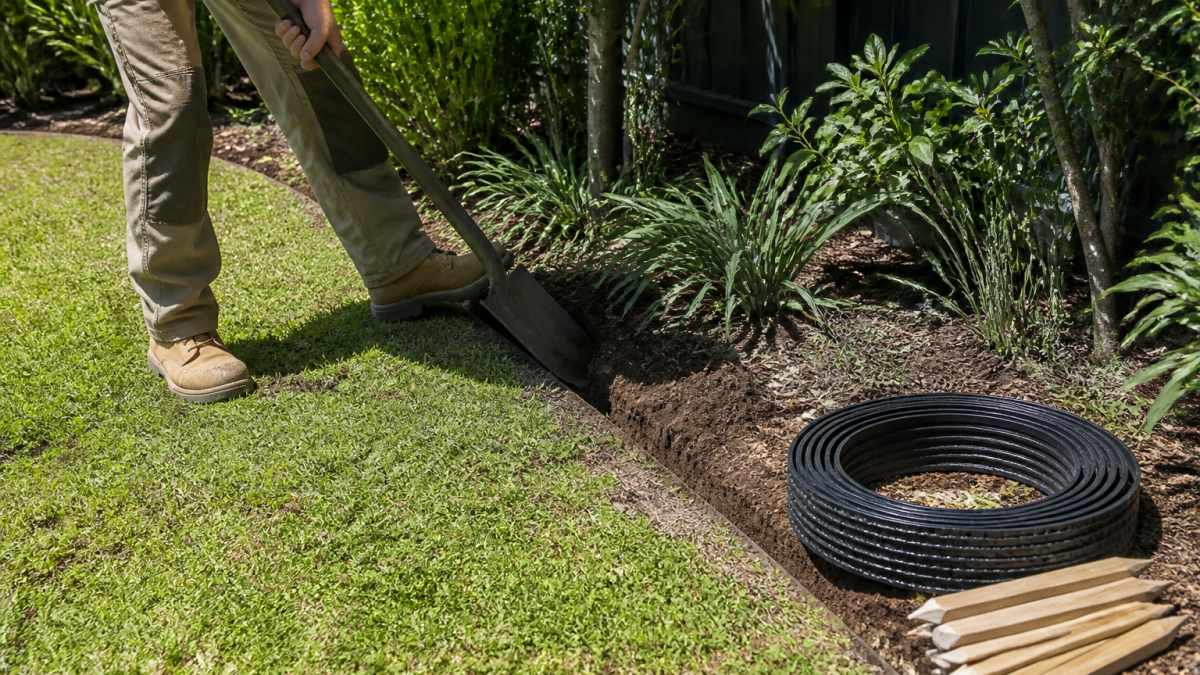
- Clear the line of grass, weeds and roots.
- Dig a narrow trench along the marked border.
- Compact the trench base so the edging sits firm.
- Set the first edging section to your chosen height.
- Join sections with connectors and drive stakes or pegs.
- Check level and height as you go.
- Backfill both sides and compact the soil.
- Trim the finished line and water the bed in.
Work in short runs and check the level often. A border that wanders off line is hard to correct once backfilled. For beds that need fresh mulch after installation, choosing the right mulch for Sydney soil conditions makes a real difference to how the finished border looks and performs.
Plastic Garden Edging Installation: A Flexible Option for Curved Beds
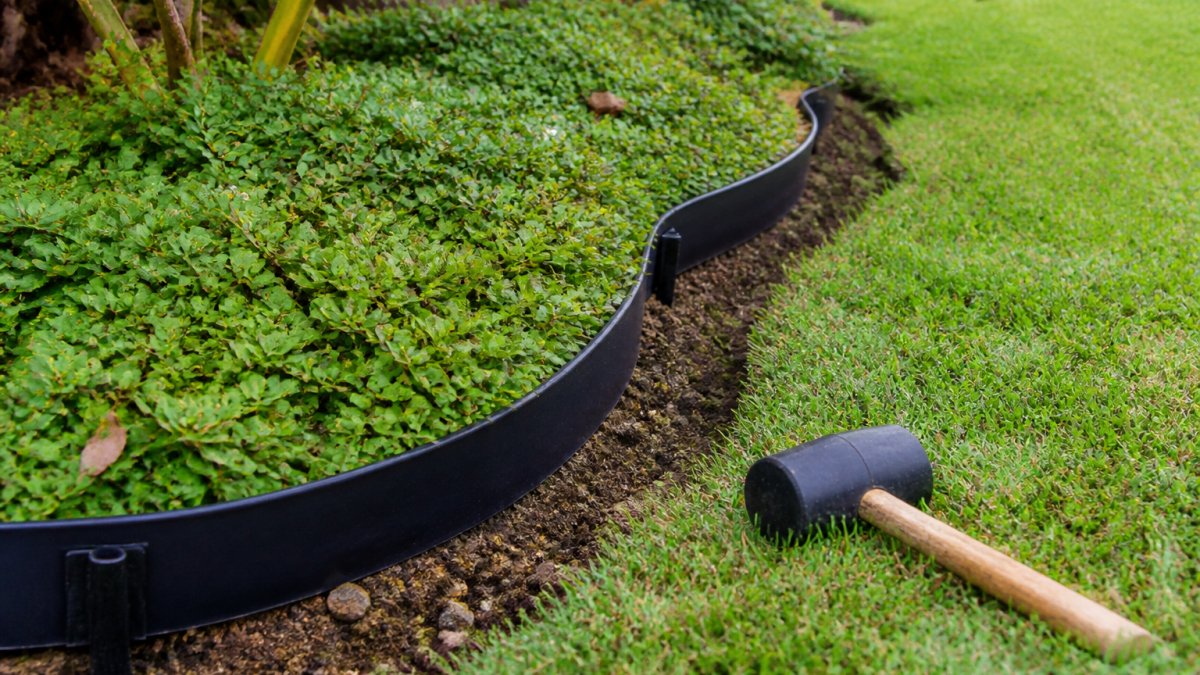
Plastic garden edging is the easiest choice for curved beds because it bends to follow the line without kinking. Warm it slightly on a cool day to make it more pliable, then press it into the trench as you go.
Join lengths with the supplied connectors rather than overlapping them. Overlaps create weak points that push out of line over time. Drive stakes through the fixing holes at regular spacings, and keep the top edge at a consistent height above the soil.
Plastic is not the toughest option, but for ground covers that spread by surface runners it does the containment job well. If you are replacing lawn with low maintenance ground cover plants, flexible edging helps you shape the new bed around the planting.
Preventing Ground Covers from Spreading Beyond the Border
Containment is the whole point of edging around ground covers, and plants escape a border in three predictable ways: they run over the top, they tunnel underneath, or they bridge across on soil and mulch that has built up against the edging. Each has a different fix, and a border that only addresses one will still leak.
Over-topping happens when runners reach the lip and simply drape across it. The fix is a continuous lip the stems cannot easily cross, combined with regular trimming along the border line. Trim before runners reach the edging rather than after, because a runner that has already rooted on the far side is harder to remove cleanly.
Tunnelling is the rhizome problem. Ordinary edging is sufficient for clumping and surface-running covers, but aggressive rhizome spreaders need a deeper barrier that extends below the rhizome zone.
Bridging is the quiet one. Mulch, soil splash and leaf litter build up against the edging over time, raising the effective ground level until runners can cross the lip without ever touching the barrier.
- Trim runners before they reach the lip, not after
- Keep mulch below the top of the edging to prevent bridging
- Use a continuous root barrier for aggressive rhizome spreaders
- Check joins and overlaps in the barrier, not just the visible line
- Re-compact backfill where it settles after rain
- Inspect the border after storms and after mulching
On sloped beds, water running along the border can wash soil away and open gaps that plants exploit. If your site drains poorly, improving drainage on sloped garden beds before the border fails is cheaper than rebuilding it.
If a vigorous cover, a slope or poor drainage is involved, containment is worth designing rather than improvising. FDSS Landscaping Services can plan the border, barrier depth and drainage together so the planting stays where you put it.
Request a Landscaping Quote for Your Garden Edging Project
Edging looks simple until a curved bed, a slope or a stubborn ground cover gets involved. Getting the layout, depth and drainage right the first time saves a lot of rework.
If you would rather hand the job to a team that builds garden borders every week, FDSS Landscaping Services can help. We handle landscape design, garden construction and the hardscape work around your beds, from concept through to completion.
Get started with FDSS Landscaping Services and request a quote for your garden edging and bed preparation. You can also explore our landscape design services if you want the whole outdoor space planned properly.
A tidy border is one of the cheapest ways to make a garden look finished, but the prep behind it is what makes it last. If you want the layout, depth and drainage sorted by an experienced team, FDSS Landscaping Services can design and build the whole garden edge for you.
Frequently Asked Questions
What is the recommended edging height?
While a common guideline suggests edging should sit about 75mm above the soil to create a visible barrier, the ideal height depends on your specific ground cover and site conditions. For spreading plants, a taller barrier or deeper burial may be necessary. Always consider local council requirements and the slope and drainage of your garden before finalising the height.
How deep should garden edging be buried for ground covers?
The required depth varies depending on the ground cover's growth habit. Shallow-rooted covers might only need about 100mm of burial, whereas aggressive spreaders like mint or ivy often require 150mm or more, with some installations going deeper to effectively block rhizomes. The key is to bury the edging below the root zone and ensure enough height remains visible to contain the plants. It's advisable to test your soil conditions first and adjust the depth based on the vigour of your plants.
What are common mistakes when installing garden edging?
Common mistakes include digging a trench that is too shallow, failing to adequately compact soil around the edging, and not using a string line for straight borders. Another frequent error is selecting a material that is unsuitable for the site's drainage or soil type. Furthermore, omitting root barriers for invasive ground covers can lead to rapid spread. Taking sufficient time for planning and preparation helps to avoid these issues.
How do you stop ground covers spreading beyond garden edging?
To effectively stop ground covers from spreading beyond your garden edging, ensure the edging is installed to a sufficient depth to block roots and rhizomes, and consider incorporating a physical root barrier. Regularly trim any runners that attempt to cross the border. For particularly vigorous species, a rigid material like steel or composite may offer better containment than flexible plastic. It's also important to maintain a clear gap between the edging and adjacent lawn or garden beds to facilitate early detection of any escapes.

Frequently Asked Questions
What is the 3 inch edging rule?
The 3 inch edging rule is a common guideline suggesting edging should sit about 75mm above the soil to create a visible barrier. However, the right height depends on your ground cover and site conditions. For spreading plants, you may need a taller barrier or deeper burial. Always check local council requirements and consider the slope and drainage of your garden before settling on a height.
How deep should garden edging be buried for ground covers?
Depth varies by ground cover type. Shallow-rooted covers may only need 100mm burial, while aggressive spreaders like mint or ivy often require 150mm or more, with some installations going deeper to block rhizomes. The key is to bury below the root zone and leave enough visible height to contain growth. Test soil conditions first and adjust based on how vigorous your plants are.
What are common mistakes when installing garden edging?
Common mistakes include digging a trench that is too shallow, failing to compact soil around the edging, and not using a string line for straight borders. Another frequent error is choosing a material that does not suit the site's drainage or soil type. Also, skipping root barriers for invasive ground covers can lead to rapid spread. Taking time to plan and prepare avoids these issues.
How do you stop ground covers spreading beyond garden edging?
To stop ground covers from spreading, install edging deep enough to block roots and rhizomes, and consider adding a physical root barrier. Regularly trim any runners that attempt to cross the border. For vigorous species, a rigid material like steel or composite may work better than flexible plastic. Also, maintain a clear gap between the edging and adjacent lawn or garden beds to spot escapes early.