 ultimate-guide
Timber Retaining Wall: Build, Design & Maintain
Table of Contents
- What Is a Timber Retaining Wall?
- Treated Pine vs Hardwood Sleepers: Which Material Suits Your Project
- Retaining Wall Drainage Requirements: Protecting Structural Integrity
- Step-by-Step Construction Process for Timber Retaining Walls
- Retaining Wall Council Approval: Permits and Compliance
- Tools, Materials and Safety Essentials
- Common Failures and How to Avoid Them
- Frequently Asked Questions
Last Updated: August 20, 2026
What Is a Timber Retaining Wall?
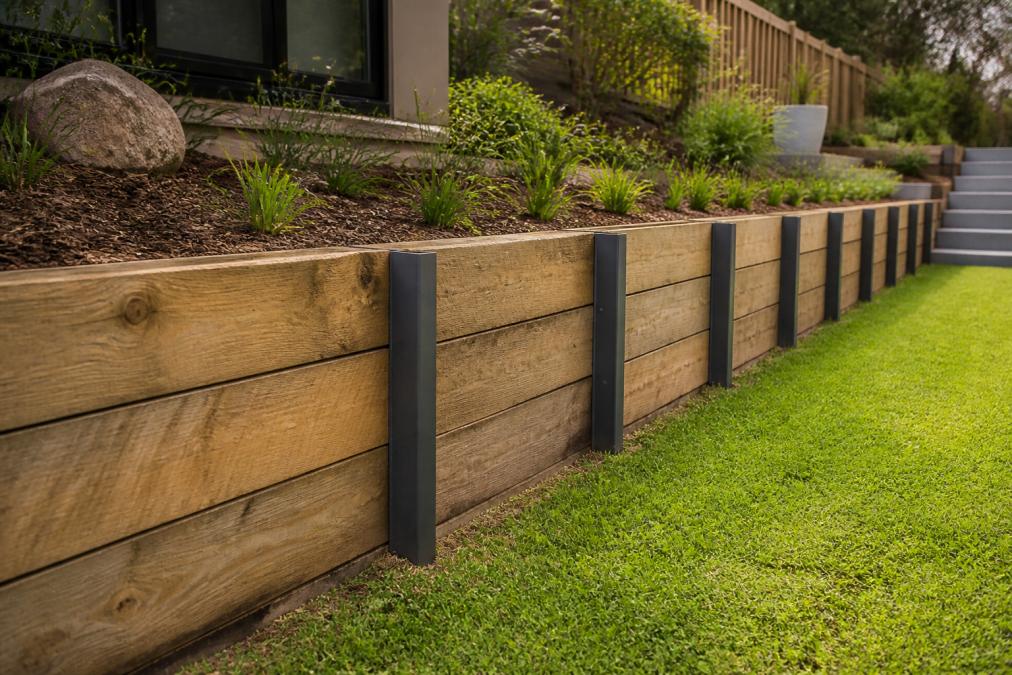
A timber retaining wall is a structural barrier built from timber sleepers that holds back soil on sloping sites, preventing erosion and creating level outdoor spaces. These walls are popular for residential properties because they combine functionality with aesthetic appeal, blending naturally into garden settings while managing water flow and soil movement.
Timber retaining walls stabilise sloping terrain, create usable terraced areas, and define garden boundaries. Structural integrity depends on proper foundation depth, post spacing, drainage design, and material selection. A well-constructed timber retaining wall can last 10-15 years or more, depending on timber type and site conditions. The construction process involves excavation, concrete footings for posts, assembly of timber sleepers, and careful drainage design to manage hydrostatic pressure behind the wall.
Treated Pine vs Hardwood Sleepers: Which Material Suits Your Project
Choosing between treated pine and hardwood sleepers is one of the most important decisions in timber retaining wall design. Both materials have distinct advantages, and the right choice depends on your budget, expected lifespan, and site conditions.
Treated pine sleepers are the more economical option. They're chemically treated to resist rot and insect damage, making them suitable for ground contact. Treated pine offers good value and is widely available across Sydney. However, treated pine has a shorter lifespan in harsh conditions, coastal areas with salt air exposure or sites with poor drainage may see degradation within 10 years. The timber can also warp or cup over time, particularly if drainage is inadequate.
Hardwood sleepers, such as ironbark, spotted gum, or blackbutt, offer superior durability and rot resistance. Hardwoods naturally contain compounds that resist decay, fungal attack, and insect damage without relying solely on chemical treatment. They're more stable dimensionally, meaning less warping and movement over time, crucial for structural integrity on sloping sites where ground settlement or hydrostatic pressure places ongoing stress on the wall. Hardwood sleepers typically last 20+ years, even in challenging coastal or wet environments.
The trade-off is cost. Hardwood sleepers command a higher price than treated pine. For larger structures or commercial projects, material costs escalate significantly. However, the extended lifespan and reduced maintenance often justify the investment, particularly if the property is in a high-moisture or coastal location.
When selecting sleepers, consider the site's drainage characteristics, exposure to salt air or high rainfall, and expected wall lifespan. At FDSS Landscaping Services, we source certified timber that meets Australian Standards for structural timber framing, ensuring your wall is built from materials that will perform reliably.
Retaining Wall Drainage Requirements: Protecting Structural Integrity
Drainage is the most critical factor in preventing timber retaining wall failure. Poor drainage leads to hydrostatic pressure buildup behind the wall, which forces the structure outward and accelerates timber decay.
Water accumulates behind retaining walls because soil naturally traps moisture. Without drainage, this water creates lateral pressure that increases with depth. A 1.5-metre wall can experience significant force, and taller walls face exponentially greater pressure. This pressure pushes against the sleepers, stressing the posts and fasteners, while saturating the timber and creating conditions where rot organisms thrive.
The solution involves three key elements: drainage aggregate, geotextile fabric, and weep holes.
Drainage aggregate (typically 20-40mm gravel or crushed rock) is placed behind the wall, creating a permeable layer that allows water to flow downward rather than accumulating horizontally against the timber. This aggregate should extend the full height and depth of the wall, typically 300-600mm behind the sleepers depending on soil type and site water conditions.
Geotextile fabric is laid between the native soil and the drainage aggregate. This non-woven fabric prevents fine soil particles from migrating into the gravel layer, which would clog the aggregate and reduce drainage effectiveness. The fabric allows water to pass through while blocking soil.
Weep holes are small openings (typically 50-100mm diameter pipes or gaps) drilled through the bottom courses of the wall to allow accumulated water to escape. These holes prevent water from pooling at the base, which would saturate the lowest sleepers and accelerate decay. Weep holes should be spaced at regular intervals, typically every 1-2 linear metres.
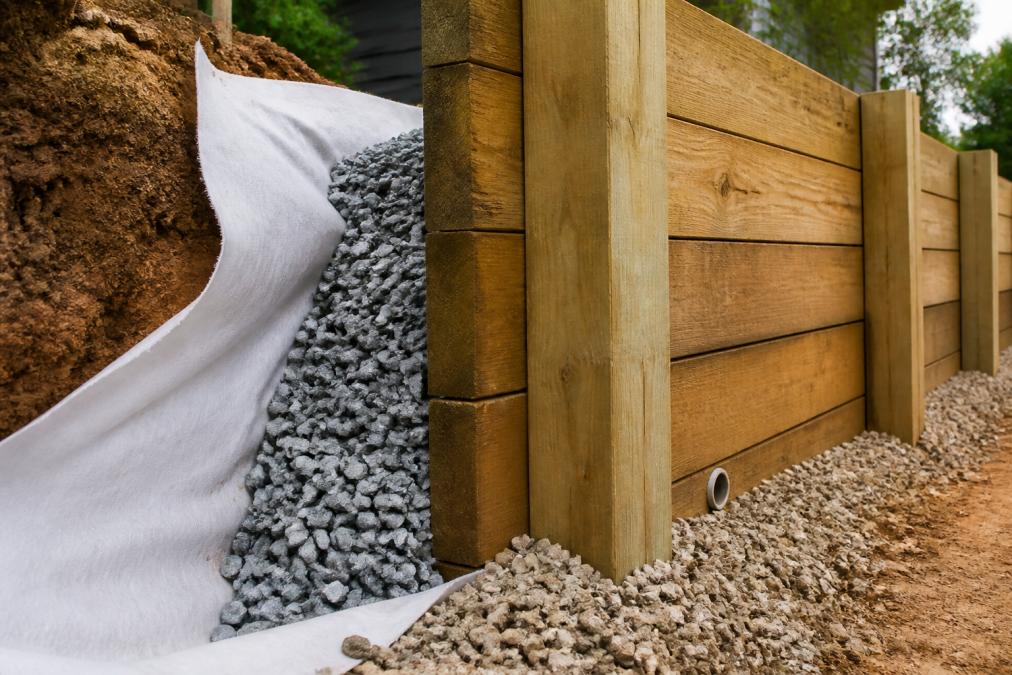
The slope of the land also influences drainage design. On sloping sites where water naturally flows toward the wall, the drainage system must handle greater volumes. In these cases, a French drain (perforated pipe surrounded by gravel) may be installed behind the wall to intercept and redirect water downslope.
When designing a timber retaining wall, consult local council guidelines and relevant Australian Standards to ensure your drainage design meets regulatory requirements. Requirements vary by site, soil type, and wall height. FDSS Landscaping Services designs and constructs drainage systems that protect your wall for years to come.
Step-by-Step Construction Process for Timber Retaining Walls
Building a timber retaining wall requires careful planning and precise execution. The process moves through distinct phases: site preparation, foundation installation, sleeper assembly, and finishing.
Site Preparation and Excavation
Before any timber goes in, the site must be properly prepared. This starts with marking the wall line and determining the finished height. On sloping sites, you'll need to establish where the wall sits relative to the existing ground level and where the terraced area will be.
Excavation removes topsoil and loose material from the wall area. The excavated trench should be wide enough to accommodate the posts (typically 100-150mm) and deep enough to reach stable soil. The base of the trench must be compacted to prevent settlement. Loose soil under a retaining wall will compress under load, causing the wall to sink unevenly and creating structural problems. Use a hand tamper or mechanical compactor to firm the base.
Foundation and Post Installation
The posts are the wall's backbone. They transfer the load of soil and water pressure into the ground, so their depth and spacing are critical.
Post holes are dug to a depth that depends on wall height and soil conditions. As a general rule, posts should be buried at least one-third of the wall's total height. For a 1.5-metre wall, posts would typically be set 500-600mm deep. In poor soil or on steep slopes, deeper footings may be required.
Concrete footings anchor the posts and prevent them from shifting. A concrete footing (typically 300-400mm deep) is poured into each post hole, holding the post plumb (perfectly vertical). The concrete should cure for at least 48 hours before assembly begins. Galvanised or stainless steel brackets may be embedded in the concrete to secure the post, adding extra resistance to lateral movement.
Post spacing typically ranges from 1.2 to 2 metres, depending on sleeper size and soil pressure. Your designer will calculate optimal spacing based on wall height and soil conditions.
Assembly and Securing Sleepers
Once posts are set and concrete has cured, sleepers are attached horizontally between the posts.
Sleepers are typically positioned with their longest dimension horizontal, creating a strong, stable face. They're secured to posts using galvanised coach screws (or bolts), which resist corrosion and maintain grip over time. Screws are preferable to nails because they can be tightened if the timber shrinks or settles.
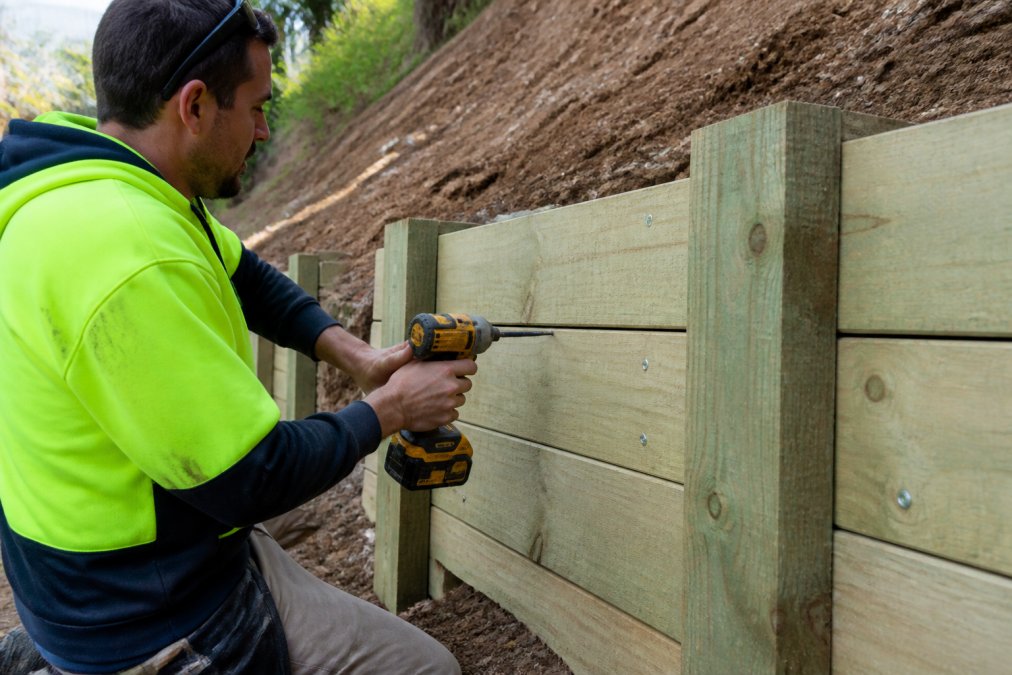
The sleepers are stacked and secured from bottom to top. Each sleeper should be level before fastening. On sloping sites, the wall face may step up in stages rather than being perfectly vertical, creating a more stable and visually appealing structure.
Drainage aggregate and geotextile fabric are installed as the wall rises. The fabric is laid against the native soil, and gravel is placed behind the sleepers in 150-200mm lifts. Each lift should be lightly compacted to ensure good contact and prevent settling. Once all sleepers are in place and secured, weep holes are drilled or installed at regular intervals near the base. A capping rail is often installed along the top for aesthetics and to provide a finished edge.
Retaining Wall Council Approval: Permits and Compliance
Retaining walls are regulated structures, and council approval is typically required before construction begins. The specific requirements depend on the wall's height, location, and site conditions.
Most councils require development approval for retaining walls exceeding 1 metre in height, particularly if they're on or near a property boundary. Some councils have different thresholds, so it's essential to check with your local authority early in the planning process.
When applying for approval, you'll generally need to submit plans showing the wall's height, materials, foundation design, drainage system, and how it relates to neighbouring properties. An engineer's report may be required for walls exceeding 1.5 metres or where soil conditions are uncertain.
The approval process ensures the wall won't cause erosion on neighbouring land, won't create flooding or drainage problems, and won't pose a safety risk. Councils also check that the design complies with relevant Australian Standards for structural timber and retaining wall construction.
Building a wall without required approval can result in enforcement action, fines, or orders to demolish the structure. FDSS Landscaping Services manages the approval process and liaises with councils to ensure your project meets all regulatory requirements.
Tools, Materials and Safety Essentials
Constructing a timber retaining wall requires specific tools and materials.
Essential tools include:
- Excavation equipment (mini-digger or hand tools for smaller projects)
- Spirit level and laser level for checking plumb and level
- Power drill with driver bits for coach screws
- Circular saw or hand saw for cutting timber
- Measuring tape and chalk line for marking
- Hand tamper or mechanical compactor for soil compaction
- Safety equipment: hard hat, safety glasses, work gloves, steel-capped boots
Materials checklist:
- Treated pine or hardwood sleepers (sized to your design)
- Posts (typically 100 × 100mm or 150 × 150mm treated timber or steel)
- Galvanised coach screws and washers
- Concrete for footings
- Drainage aggregate (20-40mm gravel)
- Geotextile fabric
- Perforated drainage pipe (if installing a French drain)
- Capping rail for finishing
Safety is non-negotiable. Retaining walls involve excavation, heavy lifting, and power tools. Always wear appropriate PPE. If you're hiring a contractor, verify they have relevant safety training and insurance. Excavation work near underground services requires careful planning and location checks before digging begins.
Common Failures and How to Avoid Them
Understanding why timber retaining walls fail helps you prevent costly problems.
Poor drainage is the leading cause of failure. When water accumulates behind the wall, hydrostatic pressure increases and timber begins to rot. Prevention: install drainage aggregate, geotextile, and weep holes during construction and maintain the drainage system by clearing debris from weep holes.
Inadequate post depth causes walls to tilt or collapse under soil pressure. Prevention: follow engineering recommendations for post depth based on wall height and soil conditions.
Poor compaction of backfill allows soil to settle over time, creating gaps between sleepers and posts. Prevention: compact backfill in 150-200mm lifts as you build using mechanical compaction equipment.
Timber decay accelerates when the wall is regularly wet or when drainage fails. Prevention: use treated pine or hardwood sleepers appropriate for ground contact and maintain drainage to keep timber dry.
Fastener corrosion occurs when non-galvanised screws or bolts rust and lose grip. Prevention: always use galvanised or stainless steel fasteners and check them periodically.
Inadequate post spacing means sleepers aren't sufficiently supported, causing them to sag or bend under load. Prevention: calculate post spacing based on sleeper size and soil pressure.
Building a timber retaining wall is a significant undertaking that requires attention to drainage, structural design, and material selection. Whether you're managing a small residential project or a larger development, proper planning and quality construction are essential to long-term performance.
If you're planning a retaining wall project in the Hills District or North-West Sydney, FDSS Landscaping Services can guide you through design, approvals, and construction. We manage every phase, from initial concept and 3D design through to completion, ensuring your wall is built to last. Request a landscaping quote and discuss your retaining wall requirements with our experienced team.
Frequently Asked Questions
Do I need council approval for a timber retaining wall?
Most councils require approval for retaining walls above a certain height, typically 1 metre. Some areas have stricter rules depending on proximity to property boundaries, soil conditions and slope. Contact your local council before construction to confirm requirements for your site. Your landscaping professional can help navigate the approval process and ensure your design meets building regulations.
What is the difference between treated pine and hardwood sleepers for a retaining wall?
Treated pine is more affordable and suitable for moderate climates, with good rot resistance when properly treated. Hardwood offers superior durability and longevity, especially in harsh coastal conditions with salt air and moisture. Hardwood requires less maintenance over time but costs more upfront. Your choice depends on wall height, climate exposure, budget and how long you want the wall to last before replacement.
How does drainage affect the lifespan of a timber retaining wall?
Proper drainage is critical. Without it, hydrostatic pressure builds behind the wall, causing structural failure and accelerating timber rot. Drainage aggregate, geotextile fabric and weep holes allow water to escape, reducing soil pressure and protecting the timber from constant moisture contact. Poor drainage can halve the wall's lifespan. This is why professional design and construction focus heavily on drainage systems.
How long will a timber retaining wall last?
Treated pine typically lasts 10-15 years with proper drainage and maintenance. Hardwood can last 20-30 years or longer. Lifespan depends on timber quality, drainage effectiveness, soil conditions, climate exposure and maintenance. Regular inspection for rot, pest damage and structural movement helps extend the wall's life. Professional construction using quality materials and correct drainage practices maximises durability.